Wednesday, December 16, 2020

Last Post !! Moved to new site

As I am getting old 😋, it seem like I can not remember many of my earlier tech encounters. This is the place I was logging so that I refer back later in time. 😂 Among several reasons

- I had two sites: Tech blog and Personal blog  to maintain on blogger.
- It seem very difficult to post here. Rich text format. Yack.
- Searching is difficult. Now, I can search with few key stokes.

So, I have decided to do move/log my tech counters+personal items from now on to my personal site. 

mrprajesh.co.in/blog  //Simple blog with search!
mrprajesh.co.in/rajzdocs  //Quick Cheat sheet

Happy that Pandemic Year (2020) is finally coming to a end. Hope for a better year, next year 2021!

Good bye blogger!


Saturday, November 21, 2020

Climate and weather monitoring sites

Some links are outdated.

//TODO

- rainfall in all substations in TN
- Various Prediction Models

There is a private weather blogger TN weatherman
https://www.facebook.com/tamilnaduweatherman/posts

I have seen weatherman using many different tools of IMD, and other things on the internet. This list heavily influences from him and my our finding on the internet. Thanks to Google.

Doppler Radars (this has an accuracy of 30 mins)
IMD Main - http://imd.gov.in/pages/radar_main.php?adta=chn
IMD Dop - http://www.imd.gov.in/section/dwr/dynamic/dwr.htm
IMD Anim - http://www.imd.gov.in/section/dwr/img/Animation/dop_ani_main.htm


Thunder Storm Nowcast
http://nwp.imd.gov.in/ts/nowcast_new.php


Chennai Live weather (down at times)
http://59.90.28.39:8085/liveweather/index.php

Chennai Lake levels
https://chennaimetrowater.tn.gov.in/public/lake.html

Customized Rainfall information System CRIS
http://hydro.imd.gov.in/hydrometweb/(S(shcjnzfpnpbe0qedaom40lrj))/landing.aspx
Spatial>Daily

Any City Forcast past 24 hours.
http://imd.gov.in/pages/city_weather_show.php

Automatic Weather Station (AWS) and Automatic Rain Gauge(ARG) Stations
http://aws.imd.gov.in/
> ARG DATA
> Daily rainfall

PDF of Rainfall by IMD daily(5PM) and past days
http://www.imdchennai.gov.in/rsum.htm


Ground Water Level - Chennai
https://www.facebook.com/pg/CMWSSB/posts

Thursday, February 27, 2020

[Resolved] - Cannot launch Nvidia Visual Profiler on Ubuntu / Mint

My Linux Mint / Ubuntu 18.04 had openjdk 11.0.2 installed by default but it showed the below error. nvvp or Nvidia Visual Profiler (or even with nSight) requires jre-8 as a MUST.

$ nvvp
WARNING: An illegal reflective access operation has occurred
WARNING: Illegal reflective access by org.eclipse.osgi.storage.FrameworkExtensionInstaller (file:/usr/local/cuda-10.0/libnvvp/plugins/org.eclipse.osgi_3.10.1.v20140909-1633.jar) to method java.net.URLClassLoader.addURL(java.net.URL)
WARNING: Please consider reporting this to the maintainers of org.eclipse.osgi.storage.FrameworkExtensionInstaller
WARNING: Use --illegal-access=warn to enable warnings of further illegal reflective access operations
WARNING: All illegal access operations will be denied in a future release


Work around measures

Step 1. sudo apt install openjdk-8-jdk
Step 2. nvvp -vm /usr/lib/jvm/java-8-openjdk-amd64/jre/bin/java

That's it! tata

Monday, December 16, 2019

Building Gunrock on redhat/centOs

How to build the latest version of Gunrock (a popular GPU Graph analytic library) on Redhat/Centos based systems


Prerequisites:
- cmake 3.10+
- GCC 4.8+

Although building gunrock is easy on Ubuntu 18.04, it is not easy for other OSs.
In most of the RedHat rpms, cmake is not the latest. Sometimes we do not have root/admin rights to install. In such scenarios, below steps to build cmake/gunrock.

Build/Download cmake - 4 steps
1. Download cmake*.tar.gz from https://cmake.org/download/ 
   download either src or binary 

2. Extract

3) // do either a or b

a. if src, cd to cmake directory and do make
b. if binary, do nothing


4. To verify
./cmake-3.14.7/bin/cmake --version
displays as below
cmake version 3.14.7

CMake suite maintained and supported by Kitware (kitware.com/cmake).


Build Gunrock - 6 steps
1.) Set and export CUDA Bin path to your cuda. Mine is 9.1. Note a non-default location!

CUDA_BIN_PATH=/usr/local/cuda-9.1
export CUDA_BIN_PATH

2)
git clone --recursive https://github.com/gunrock/gunrock/
cd gunrock


3)

 In gunrock folder, edit CMakeLists.txt
 at the following lines as per your GPU card. Ours is Nvidia P100. So, I
 have changed that corresponding flag from OFF to ON. Find your card name using nvidia-smi command. 

if (CUDA_VERSION VERSION_EQUAL "8.0" OR CUDA_VERSION VERSION_GREATER "8.0")
  option(GUNROCK_GENCODE_SM60
    "ON to generate code for Compute Capability 6.0 devices (e.g. Tesla P100)"
    ON)


Note: This Step may not be needed due to this #665 pull request


4) 
mkdir build && cd build 
~/install/cmake-3.14.7/bin/cmake ..

we are using the cmake which we downloaded/build previously.
Note: Always make sure your build folder is empty before cmake. If you end up with some errors due to cmake; make sure to delete all files and folders from build before performing cmake again.


Upon success. Should display the following:
..
-- Project Added: bc
-- Project Added: bfs
-- Project Added: color
-- Project Added: geo
-- Project Added: hits
-- Project Added: knn
-- Project Added: louvain
-- Project Added: pr
-- Project Added: pr_nibble
-- Project Added: proj
-- Project Added: rw
-- Project Added: sage
-- Project Added: sm
-- Project Added: ss
-- Project Added: sssp
-- Project Added: tc
-- Project Added: vn
-- Configuring done
-- Generating done
-- Build files have been written to: /home/rajesh/tmp/gunrock/build2


5) make

Takes up to an hour or so as. If no error, then that's all. If you need only a specific algorithm (say SSSP), then read A1 below.

6) To test, cd to bin inside build dir
./sssp market ../dataset/small/test_mst.mtx

...sample output..
Distance Validity: PASS
First 40 distances of the GPU result:
[0:0 1:2 2:4 3:19 4:14 5:2147483647 6:2147483647 7:2147483647 8:2147483647 ]
First 40 distances of the reference CPU result.
[0:0 1:2 2:4 3:19 4:14 5:2147483647 6:2147483647 7:2147483647 8:2147483647 ]

[sssp] finished.
 avg. elapsed: 0.551939 ms
 iterations: 4
 min. elapsed: 0.551939 ms
 max. elapsed: 0.551939 ms
 rate: 0.016306 MiEdges/s
 src: 0
 nodes_visited: 5
 edges_visited: 9
 load time: 7.15208 ms
 preprocess time: 943.713000 ms
 postprocess time: 0.494003 ms
 total time: 945.014000 ms

YAY :-)

Appendix
A1) You could build only a specific algorithm by setting an appropriate flag during your cmake as said here in advanced compilation.
e.g. Suppose if I want SSSP alone then

/cmake-3.14.7/bin/cmake -DGUNROCK_BUILD_APPLICATIONS=OFF -DGUNROCK_APP_SSSP=ON ..
//This step builds SSSP alone when you do a make.

Errors in the past that lead to the above working steps: 

E1) CMake 3.10 or higher is required.  You are running version 2.8.12.2

E2) CMake Error at /home/rajesh/install/cmake-3.16.1-Linux-x86_64/share/cmake-3.16/Modules/FindPackageHandleStandardArgs.cmake:146 (message):
  Could NOT find CUDA: Found unsuitable version "8.0", but required is at
  least "9.0" (found /usr)
Call Stack (most recent call first):
  /home/rajesh/install/cmake-3.16.1-Linux-x86_64/share/cmake-3.16/Modules/FindPackageHandleStandardArgs.cmake:391 (_FPHSA_FAILURE_MESSAGE)
  /home/rajesh/install/cmake-3.16.1-Linux-x86_64/share/cmake-3.16/Modules/FindCUDA.cmake:1104 (find_package_handle_standard_args)
  CMakeLists.txt:41 (FIND_PACKAGE)


END- gunrock-cmd.txt

Saturday, September 14, 2019

Awesomeness of ffmpeg

ffmpeg is a powerfuly CLI tool. It has helped me many times. Assuming that it is installed.

Question: How to covert a video file to an audio file using ffmpeg in Linux

$ ffmpeg -i input-video.mp4 output-audio.mp3
$ ffmpeg -i input-video.mp4 output-audio.wav 

Note: Supports most of the audio formats.

Question: How to increase the audio quality or amplfying the audio in a video  using ffmpeg.

$ ffmpeg -i 'input-video.mp4'  -vcodec copy -af "volume=30dB" 'output-video-30db.mp4'

set volume appropriately as 10/20/30/40 DB depeding on how much audio you need to amplify in your input-video file. This works amazing well. You would not believe it.

Tata, See you.

MKV - dual or multi audio in a singe video file

MKV is one the famous video format for the movie watchers/collectors online.
WIKI says The Matroska Multimedia Container is a free, open-standard container format, a file format that can hold an unlimited number of video, audio, picture, or subtitle tracks in one file.

I am fan of the following feature. You can choose the audio language during play back. It work cools on vlc player. This would avoid creating or downloading multiple times say if we want a movie in Tamil as well as English.

I was really surprised why YouTube or vimeo did not adopt to such kind of player. That can play multiple audios/language. Maybe it will come in future some day.  Currently we have only different language subtitles for one video with single audio track. The future is single video with multiple audio tracks. This could be a boon for video creators.

It would be nice to have a player like this below.  In this below player click the headphone icon -- you can change the lang of video ENGLISH or SPANISH.

https://paellaplayer.upv.es/demos/multi-audio-tracks/

You could create a such a video. But we need a player(as above) to play such video on the web or our website. I still have not figured out how to add paella player to my site.

On a side note. How do we create a such a video. It is easy. There is a tool called MKVToolNix GUI.

Sooner or later YouTube will have this feature.

Okay. more later. Tata.

Using GNU Parallel on Linux

Sometime ago I had created a C/C++ program to find the LAN machine/IP that is powered ON or OFF in our Departmental Computing Facility[DCF]. The local IPs have changed now.

The important thing was that program pings each machines/IP address one after another. It would take a lot of time. Recently, I have seen a cmd/package called parallel  that does it in one line linux command. Cool. I can add this to my bashrc which would need only 3 key stokes to find what I wanted.

If it is not installed already, do it

$ sudo apt-get install parallel


$ parallel --halt now,success=1 ping -c1 10.21.225.{1}{2} ::: 0 1 2 ::: 1 2 3 4 5 6 7 8 9 0

This is the one line cmd. Lets break it down and see what it says.

$ parallel echo {1}{2} ::: 0 1 2 ::: 1 2 3 4 5 6 7 8 9 0

what does the above command do. Prints all the numbers from 00 to 29. i.e echo 30 times.

echo 00
echo 01
...
echo 29

parallel does the same, but the order is immaterial.

But, to my purpose I used to check $? whether  0 or 1 or something in my old script. This is done smarter here.

--halt now,success=1 means stop running jobs even if one job is succeeded. WOW!


$ parallel --halt now,success=1 ping -c1 10.21.225.{1}{2} ::: 0 1 2 ::: 1 2 3 4 5 6 7 8 9 0 > /dev/null

I use the above line which prints only the IP I wanted. YAY!
Tata. See you. 

Sunday, August 18, 2019

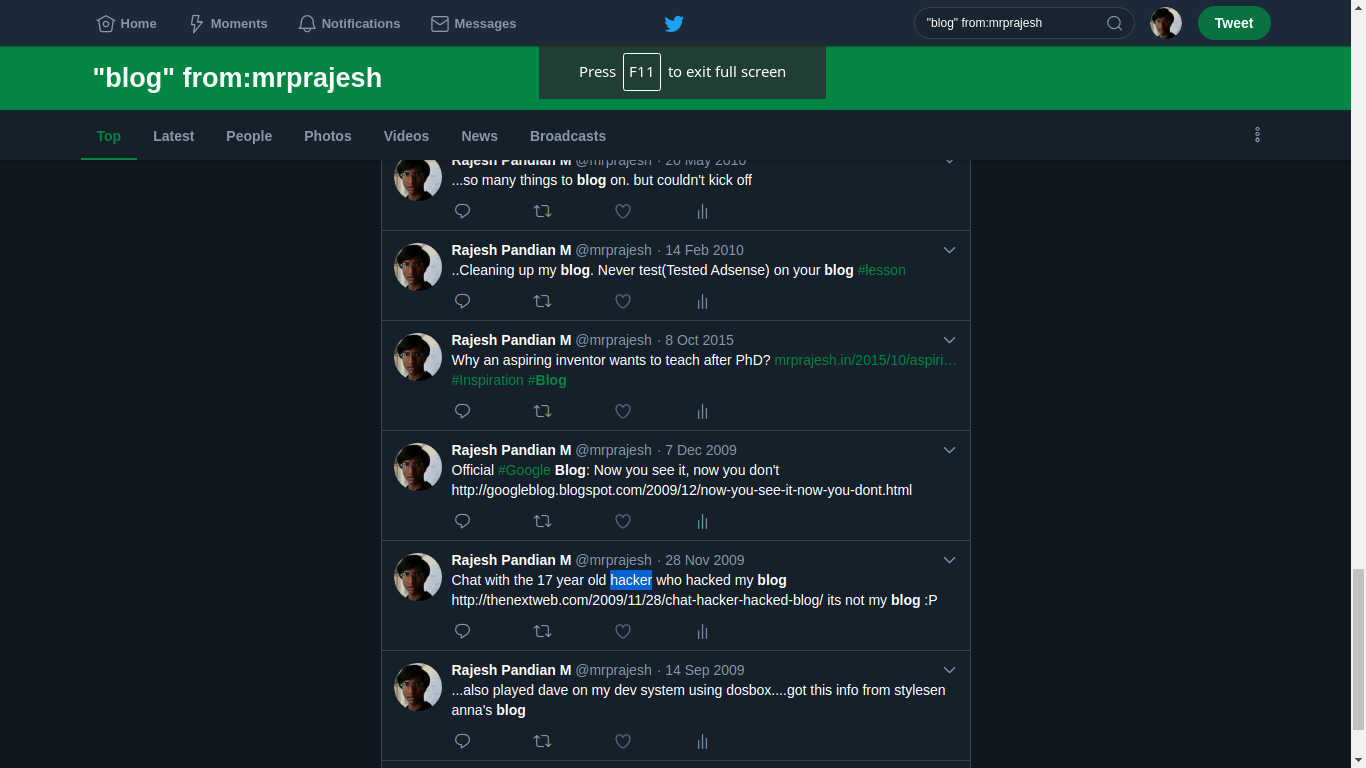
Search your own old tweets

Most often I would want to refer some of my old tweets. By old I meant 2-4 years back. I was unsure until someday, I learnt about this twitter advanced search.

https://twitter.com/search-advanced

The Search window


In here I can user my handle From these accounts: mrprajesh
Then search for one or two word. This very handy. This what happen when tried to find blog keyword from my old tweets.


Yay!!
See you, tata.

Monday, July 15, 2019

How to build Green-Marl on Ubuntu 18.04 or later / Linux Mint 19

The offcial Green-Marl from Stanford is old at least 5 years(as on date). The master branch is not able to build/make sucessully. There were some errors and build got failed. Fortunately, I saw a pullrequest #132 by Reto Achermann @achreto and it works like charm.

$ mkdir achretoGreenMarl && cd achretoGreenMarl
$ git clone https://github.com/achreto/Green-Marl.git .
$ cd achretoGreenMarl
$ make

That's it. It works fine. You could check.

$ cd achretoGreenMarl/bin
$ ./gm_comp  -v
lib this = 0x5653e0f5dde0
version 0.3.0

TaTa bye.

what is green-marl? see this

The below was the error when building from https://github.com/stanford-ppl/Green-Marl

collect2: error: ld returned 1 exit status
Makefile:196: recipe for target '../bin/gm_comp' failed
make[1]: *** [../bin/gm_comp] Error 1
make[1]: Leaving directory '/home/rajz/d7/Green-Marl/src'
Makefile:49: recipe for target 'compiler' failed
make: *** [compiler] Error 2

Thursday, April 25, 2019

LaTeX Tips for writing good research article.

// Purely out of my experience(learnt from friends and experts) of using LaTeX
// for writing a good research article collaboratively; good -- In my view!
// good - easy for others to edit;


- use multiple src files and input in the main tex.
- - do not write the everything in a single file.
- - Prior to Overleaf this is modular. But even after this. it is a good practice.
e.g

\input{0ABS.tex}
\input{1INT.tex}
\input{3ALG.tex}

or  keep everything in a folder as well
\input{src/0ABS.tex}
..


- Use Overleaf is plain, simple and speeds up writing .
- - Good for collab; two persons can edit the same file simultaneously.
- - Enough of messing around with errors in texmaker[TM]/texstudio[TS]; bored of it!
- - Double click the pdf it will take you to the line or para(most of the time)!
- - Auto spell check // Never worked well TM


- User labels at a appropriate place(section, figure, subsection) with some standard form; prefix code
     \label{ intro}
e.g
     \label{fig description figure}
      I use codes ={sec, ssec, fig, table, alg, line, etc}

- Using ref and cite
- - Use it ~\ref{} or ~\cite{} so that it stays together with previous word.
- - \cite{r1,r2,r3...} can hold more than one args

- Use separate folder for fig and plot you generate.
- - Include all the source for creating image in case you wanted edit later.
- - I use Latex draw and export as pdf+cropped and include it in figure.
- - I use  pgPlot and Libre office calc for generating plots.

- Use BibTeX; User STD form in
- - use  \bibliography{GlobalBibtex} for file name GlobalBibtex.bib
- - can add mutiple bib file \bibliography{file1,file2}
- - Last name of first author and initials of rest(if any)
- - User _ write the name of paper you will calls as or would like remember as
- - overleaf can match it when citing with the name(after _) as well
- - It is always good to have your own global bibtex file
- - You ca cumulatively add(and maintain!) it as you write more.
- - Aid sin searching for bib entry in the bib file of you previously written papers.
- - Use only Conference verion of the  bib rather than a arviv if you have both.
- - Use DBLB for collection because it is nice search. You coul use others as well - but be uniform.
- - It will be nice if the bib entry has a doi/url
- - So the reader can quickly go to the ref paper in single click from the ref section.
- - Saves a lot of time in googling and find the right version(if multiple (re)versions exist), etc, etc,
- - Sometimes the CAPS may not rendered properly either in title/author name. You would have enclose those inside braces {} to force the capitalization in tact.

// I am updating these over the course of time.
Last Update: 14-Sep-2019

Monday, March 18, 2019

How to make your commits signed or verified in Github

DIY Steps
========
1. Create a GPG key (public and private key) and add it into passwords and keys (seahorse).

2. Add your GPG keys into Github
3. Create your SSH keys
ssh-keygen -t rsa -b 4096 -C "YOUR EMAIL@GMAIL.com"
// Remember the  passphrase it is essential to verified/sign
4. make sure that it is visible on your "passwords and keys"

5. Then On your terminal
cat ~/.ssh/id_rsa.pub

copy paste its content to Github

6. Set some git config if yor have not done earlier


7. That's it. Whenever you make a commit and push you will get a promt asking for pass phares (in step 3) and github credentials as usual respectively.

TADA

YOUR commits are now verified !!

Saturday, February 23, 2019

Installing Bika LIMS on Linux

 My brother wanted this for work. I am documenting for 
WARNING This procedure is incomplete and it DID NOT WORK!

1. download  and extract the latest zip https://github.com/bikalims/bika.lims/releases
 seems like bika is dead as per their github page. I got version 3.2.1rc2
2. run in terminal // probably needed dependicies for plone

sudo apt-get install python-setuptools python-dev build-essential libssl-dev libxml2-dev libxslt1-dev libbz2-dev libjpeg62-dev libz-dev

sudo apt-get install libreadline-dev wv poppler-utils


3. download latest stabe version of plone

https://plone.org/download

download  the unified installer (current v 5.1 did not work; try 4.3.11)

4.  extract and run insall.sh
select the isntall location and give a good admin pwd

You should see this once complete'
 
######################  Installation Complete  ######################

5.edit file buildout.cfg

eggs =
    Plone
    Pillow
    bika.lims
 

6: run bin/buildout
Ended with errors
7. ./bin/plonectl start
Ended with errors

4. Run this cmd after extracting it

sudo ./install.sh --target=/home/rajz/install/Plone43 --password=proot standalone

 
 5. Go to install location to edit the buildout.cfg config file /home/rajz/install/Plone43/zinstance ; add the hightligted line and save!  (you may use sudo nano buildout.cfg)
...
need-sudo = yes
index=https://pypi.python.org/simple/

--

eggs =
    Plone
    Pillow
    bika.lims
 
6.run sudo -u plone_buildout bin/buildout
//ignore dep erros

7. sudo bin/plonectl start
// errors


Wednesday, January 16, 2019

Installing LonestarGPU v3.0 on Linux Mint / Ubuntu & Errors faced during installation

These are the steps for installing.
1. Clone the release 3 repo.
git clone -b release-3.0 https://github.com/IntelligentSoftwareSystems/GaloisGPU
2. Next 
cd GloisGPU
make
../../rt/include/cutil_subset.h:10:10: fatal error: cub/cub.cuh: No such file or directory
 #include "cub/cub.cuh"
compilation terminated

This errors are due to as we have not the linked the dependencies. cub and moderngpu

3. I am using moderngpu v1.1 and cub v1.4.1 and you can download from the cub and moderngpu from the release tab.

rajz@LordOfWarriors:~/d6$ cd GaloisGPU
rajz@LordOfWarriors:~/d6/GaloisGPU$ ls -l
total 36
drwxr-xr-x 9 rajz rajz 4096 Jan 16 12:15 apps
drwxr-xr-x 2 rajz rajz 4096 Jan 16 13:37 bin
drwxr-xr-x 2 rajz rajz 4096 Jan 16 12:15 include
-rw-r--r-- 1 rajz rajz 1504 Jan 16 12:15 LICENSE.txt
-rw-r--r-- 1 rajz rajz  919 Jan 16 12:15 Makefile
-rw-r--r-- 1 rajz rajz 1967 Jan 16 12:15 README.md
drwxr-xr-x 5 rajz rajz 4096 Jan 16 12:15 rt
drwxr-xr-x 2 rajz rajz 4096 Jan 16 12:15 skelapp
drwxr-xr-x 3 rajz rajz 4096 Jan 16 12:15 tuning


// unlink the dep if present
unlink cub
unlink mgpu
 
ln -s /home/rajz/install/cub-1.4.1/ cub
ln -s /home/rajz/install/

// unlink the dep if present
unlink cub
unlink mgpu

cd rt/include/
ln -s /home/rajz/install/cub-1.4.1/cub/
ln -s /home/rajz/install/moderngpu-1.1/ mgpu

After linking, it should look like this.
rajz@LordOfWarriors:~/d6/GaloisGPU$ ls -l
total 40
drwxr-xr-x 9 rajz rajz 4096 Jan 16 12:15 apps
drwxr-xr-x 2 rajz rajz 4096 Jan 16 14:52 bin
lrwxrwxrwx 1 rajz rajz   29 Jan 16 14:37 cub -> /home/rajz/install/cub-1.4.1/
drwxr-xr-x 2 rajz rajz 4096 Jan 16 12:15 include
drwxr-xr-x 2 rajz rajz 4096 Jan 16 14:27 inputs
-rw-r--r-- 1 rajz rajz 1504 Jan 16 12:15 LICENSE.txt
-rw-r--r-- 1 rajz rajz  919 Jan 16 12:15 Makefile
lrwxrwxrwx 1 rajz rajz   33 Jan 16 14:38 mgpu -> /home/rajz/install/moderngpu-1.1/
-rw-r--r-- 1 rajz rajz 1967 Jan 16 12:15 README.md
drwxr-xr-x 5 rajz rajz 4096 Jan 16 12:15 rt
drwxr-xr-x 2 rajz rajz 4096 Jan 16 12:15 skelapp
drwxr-xr-x 3 rajz rajz 4096 Jan 16 12:15 tuning


rajz@LordOfWarriors:~/d6/GaloisGPU/rt/include$ ls -l
total 148
-rw-r--r-- 1 rajz rajz  2831 Jan 16 12:15 abitset.h
-rw-r--r-- 1 rajz rajz  4929 Jan 16 12:15 aolist.h
-rw-r--r-- 1 rajz rajz   219 Jan 16 12:15 bmk2.h
-rw-r--r-- 1 rajz rajz  6057 Jan 16 12:15 component.h
-rw-r--r-- 1 rajz rajz  4274 Jan 16 12:15 counter.h
-rw-r--r-- 1 rajz rajz  4167 Jan 16 12:15 csr_graph.h
lrwxrwxrwx 1 rajz rajz    33 Jan 16 14:43 cub -> /home/rajz/install/cub-1.4.1/cub/
-rw-r--r-- 1 rajz rajz 14929 Jan 16 12:15 cuda_launch_config.hpp
-rw-r--r-- 1 rajz rajz  2138 Jan 16 12:15 cutil_subset.h
-rw-r--r-- 1 rajz rajz  2092 Jan 16 12:15 exclusive.h
-rw-r--r-- 1 rajz rajz   633 Jan 16 12:15 failfast.h
-rw-r--r-- 1 rajz rajz  5145 Jan 16 12:15 gbar.cuh
-rw-r--r-- 1 rajz rajz   144 Jan 16 12:15 ggc_rt.h
-rw-r--r-- 1 rajz rajz   365 Jan 16 12:15 ggcuda.h
-rw-r--r-- 1 rajz rajz  1793 Jan 16 12:15 gg.h
-rw-r--r-- 1 rajz rajz  2621 Jan 16 12:15 instr.h
-rw-r--r-- 1 rajz rajz  3510 Jan 16 12:15 internal.h
-rw-r--r-- 1 rajz rajz  2114 Jan 16 12:15 lockarray.h
lrwxrwxrwx 1 rajz rajz    33 Jan 16 14:43 mgpu -> /home/rajz/install/moderngpu-1.1/
-rw-r--r-- 1 rajz rajz  4630 Jan 16 12:15 pipe.h
-rw-r--r-- 1 rajz rajz  1116 Jan 16 12:15 rv.h
-rw-r--r-- 1 rajz rajz  4139 Jan 16 12:15 sharedptr.h
-rw-r--r-- 1 rajz rajz   359 Jan 16 12:15 snfile.h
-rw-r--r-- 1 rajz rajz  2999 Jan 16 12:15 Timer.h
-rw-r--r-- 1 rajz rajz 18012 Jan 16 12:15 worklist.h


4. Now do a make from GloisGPU folder.

rajz@LordOfWarriors:~/install/GaloisGPU$ make

5. Now, the error is different

../../rt/include/cub/block/specializations/../../block/../util_ptx.cuh(694): warning: function "__all"
/usr/local/cuda-9.2/bin/..//include/device_atomic_functions.h(181): here was declared deprecated ("__all() is deprecated in favor of __all_sync() and may be removed in a future release (Use -Wno-deprecated-declarations to suppress this warning).")

../../rt/include/cub/block/specializations/../../block/../util_ptx.cuh(720): warning: function "__any"
/usr/local/cuda-9.2/bin/..//include/device_atomic_functions.h(180): here was declared deprecated ("__any() is deprecated in favor of __any_sync() and may be removed in a future release (Use -Wno-deprecated-declarations to suppress this warning).")

../../rt/include/cutil_subset.h(44): warning: function "__ballot"
/usr/local/cuda-9.2/bin/..//include/sm_20_intrinsics.h(407): here was declared deprecated ("__ballot() is deprecated in favor of __ballot_sync() and may be removed in a future release (Use -Wno-deprecated-declarations to suppress this warning).")

../../rt/include/cutil_subset.h(52): warning: function "__ballot"
/usr/local/cuda-9.2/bin/..//include/sm_20_intrinsics.h(407): here was declared deprecated ("__ballot() is deprecated in favor of __ballot_sync() and may be removed in a future release (Use -Wno-deprecated-declarations to suppress this warning).")

../../rt/include/mgpu/include/kernels/../device/../device/intrinsics.cuh(112): warning: function "__shfl_up(float, unsigned int, int)"
/usr/local/cuda-9.2/bin/..//include/sm_30_intrinsics.hpp(260): here was declared deprecated ("__shfl_up() is deprecated in favor of __shfl_up_sync() and may be removed in a future release (Use -Wno-deprecated-declarations to suppress this warning).")

../../rt/include/mgpu/include/kernels/../device/../device/intrinsics.cuh(122): warning: function "__shfl_up(int, unsigned int, int)"
/usr/local/cuda-9.2/bin/..//include/sm_30_intrinsics.hpp(174): here was declared deprecated ("__shfl_up() is deprecated in favor of __shfl_up_sync() and may be removed in a future release (Use -Wno-deprecated-declarations to suppress this warning).")

../../rt/include/mgpu/include/kernels/../device/../device/intrinsics.cuh(123): warning: function "__shfl_up(int, unsigned int, int)"
/usr/local/cuda-9.2/bin/..//include/sm_30_intrinsics.hpp(174): here was declared deprecated ("__shfl_up() is deprecated in favor of __shfl_up_sync() and may be removed in a future release (Use -Wno-deprecated-declarations to suppress this warning).")
/usr/bin/ld: ../../rt/lib/libggrt.a(ggc_rt.o): relocation R_X86_64_32 against `.rodata.str1.8' can not be used when making a PIE object; recompile with -fPIC
/usr/bin/ld: ../../rt/lib/libggrt.a(ggc_rt.link.o): relocation R_X86_64_32S against `__nv_module_id' can not be used when making a PIE object; recompile with -fPIC
/usr/bin/ld: ../../rt/lib/libggrt.a(instr.o): relocation R_X86_64_32 against `.rodata.str1.8' can not be used when making a PIE object; recompile with -fPIC
/usr/bin/ld: ../../rt/lib/libggrt.a(bmk2.o): relocation R_X86_64_32 against `.rodata.str1.1' can not be used when making a PIE object; recompile with -fPIC
/usr/bin/ld: final link failed: Nonrepresentable section on output
collect2: error: ld returned 1 exit status
Makefile:18: recipe for target 'dmr' failed
make[1]: *** [dmr] Error 1
make[1]: Leaving directory '/home/rajz/install/GaloisGPU/apps/dmr'
Makefile:12: recipe for target 'all' failed
make: *** [all] Error 2


Monday, December 10, 2018

Time synchronization issues in Dual boot Linux Mint/Ubuntu and Windows

I have always used to have the network time in my Linux Mint 19 or Windows 8. However when I switch between Linux and Windows[or vice versa] the time gets modified and wrong time would show up. This Time synchronization issues in Linux Mint/Ubuntu which can be solved by the following simple task.

Steps.
1. Use your favorite editor to edit the file as root [If file not found create a new one]. I am using xed here.

sudo xed /etc/adjtime

2. Make the file looks as below. For me, I had only the first line. I created the next two line and saved it.

0.0 0 0.0
0
LOCAL


3. Reboot!

The issues exactly what is happening in the background is very well explained in this reference article.

References: https://www.techgainer.com/fix-windows-showing-wrong-time-in-linux-windows-dual-boot-system/

Install Latex Texmaker on Linux mint 19 / Ubuntu 18.04

Installing latex is pretty straight forward. We could get it from the official packages /repos througth command line. I wish to install a "full" latex support as I don't want to install any other packages to install later on. So, the Download size is ~2.5GB and installation space need is 4.5GB roughly. Texmaker is just 5-50MB where as the rest is fully occupied by LaTeX  or TeX or TeXLive.
sudo apt-get update
sudo apt-get install texlive-full texmaker
Next things is that spell check
When do a check spelling you will get an "Error can't open dictionary"
Go to Options>Configure>Editor tab
Change myspell to hunspell dictionary. I wanted British English so I selected the below:
/usr/share/hunspell/en_GB.dic

Thanks to vijay!

Next thing is you may have to install Latexdraw for drawing pictures. It need Java SE/JDK. I installed JDK from official oracle site here. Click JDK download(I would need for java programming etc).  I used deb file. Clicking/opening it will install it automatically or based on deb file

"sudo dpkg -i jdk-11.0.1_linux-x64_bin.deb"

As oracle Jdk didn't registered in update-java-alternative or update-alternative --config java. I went to fix it manually. I was able to locate my installation at  "/usr/lib/jvm" called "jdk-11.0.1" folder.

Extract the downloaded LaTeXDraw-3.x.x.-bin.zip from https://sourceforge.net/projects/latexdraw/. After extracting run the following.

sudo /usr/lib/jvm/jdk-11.0.1/bin/java -jar installer.jar
That's it. Bye for now.
I have disabled trigger email from comment. Contact me on twitter instead for any questions.

Sunday, November 25, 2018

Install CUDA 10 on Linux mint 19 or Ubuntu 18.04

Assuming that you have nvidia GPU with cuda compatibility.
 
These are the steps for installing CUDA 10 on Linux mint 19 or Ubuntu 18.04
  • Install Linux mint 19/Ubuntu 18.04 fresh
  • Use the ppa nvidia drivers repo from lauchpad here
    • sudo add-apt-repository ppa:graphics-drivers/ppa
      sudo apt-get update
      
      
  • The version 410 is the current long term version as on date
  • From "Driver Manager" install the current stable version


  •  


    • Reboot; verify the driver installed from terminal using "nvidia-smi" command


    • Install these packages
      • sudo apt-get install build-essential dkms
        sudo apt-get install freeglut3 freeglut3-dev libxi-dev libxmu-dev
        
    • Download the deb file and follow the below steps


    • sudo dpkg -i cuda-repo-ubuntu1804-10-0-local-10.0.130-410.48_1.0-1_amd64.deb
      sudo apt-key add /var/cuda-repo-10-0-local-10.0.130-410.48/7fa2af80.pub
      sudo apt-get update
      sudo apt-get install cuda

    • That's it.
    • Default location of installation is /usr/local/cuda
    • "cuda-install-samples-10.0.sh ~/install" installs sample files
    • cd into the folder "NVIDIA_CUDA-10.0_Samples"
    • make -j2
    • Add the "PATH=$PATH:/usr/local/cuda/bin"  to your "~/.bashrc" as a last line.
      (or)
      PATH=$PATH:/usr/local/cuda/bin:/home/rajz/install/NVIDIA_CUDA-9.2_Samples/bin/x86_64/linux/release
    • run "deviceQuery" to verify the cuda installation.  And do the post installation formalities
    • sudo apt-get install g++ freeglut3-dev build-essential libx11-dev \
          libxmu-dev libxi-dev libglu1-mesa libglu1-mesa-dev


      References
      1. https://www.pugetsystems.com/labs/hpc/How-to-install-CUDA-9-2-on-Ubuntu-18-04-1184/
      2. https://www.pugetsystems.com/labs/hpc/How-To-Install-CUDA-10-together-with-9-2-on-Ubuntu-18-04-with-support-for-NVIDIA-20XX-Turing-GPUs-1236/

Saturday, November 24, 2018

Challenges in installing Linux Mint 19 to dual boot along side windows


 WARNING: There is an updated Install notes. Check out  the recent post
Had a tough time setting/installing up Linux mint 19 on my existing dual boot machine to solve these 2 problems:
1. grub-efi-amd64-signed' package failed to install into /target
2. Hash Sum mismatch.
3. shim-signed and grub-efi-amd64-signed failure to configure.
Huh. Nearly 6 hours trying to figure out.

As it happened:

I had a Linux mint 18 and a rusted windows. So I wanted to refresh my machine. So I reset factory/recovery settings on windows. And wished to install Linux mint afresh. So, I have downloaded the ISO file named linuxmint-19-cinnamon-64bit-v2.iso from the official website and verified. I have made necessary partitions while installing and installation went smooth. However, right after installing and just before grub installation, this error came up.


"GRUB Installation Failed.
The 'grub-efi-amd64-signed' package failed to install into /target/. Without the GRUB boot loader, the installed system will not boot".


To rectify this.
1. install boot-repair
sudo add-apt-repository ppa:yannubuntu/boot-repair
sudo apt-get update
sudo apt-get install boot-repair 

Open boot repair and run the recommended things. [it took 20mins; be patient] It will FAIL badly. Never mind go ahead and restart it. It worked. Because it has successfully reinstalled grub.

2. apt-get update would not completed it will show error like "Hash Sum mismatch"


E: Failed to fetch http://archive.ubuntu.com/ubuntu/dists/bionic-updates/main/binary-i386/by-hash/SHA256/a70a891ed73362c0a3966c9c6c790096f5aba663389ab578a6b991b698ae43c6  Hash Sum mismatch
   Hashes of expected file:
    - Filesize:393124 [weak]
    - SHA256:a70a891ed73362c0a3966c9c6c790096f5aba663389ab578a6b991b698ae43c6
    - SHA1:4e0cfabaaf47b0cbf6ecc284e5281430bbe530d2 [weak]
    - MD5Sum:94742010fa630d152bbff1445f6369b4 [weak]
   Hashes of received file:
    - SHA256:ea9bf28ed7d57e5bd739fc63485459130475026c35a84f25e57d2f5ca0521ec7
    - SHA1:af7bad4e086d5e768c450c77032ee520d58afeda [weak]
    - MD5Sum:aa28e356c8a66b4838a83ab18e10e2d5 [weak]
    - Filesize:393124 [weak]
   Last modification reported: Fri, 23 Nov 2018 12:50:34 +0000
   Release file created at: Fri, 23 Nov 2018 13:51:10 +0000

To resolve this:

sudo apt-get clean
sudo rm -rf /var/lib/apt/lists/partial
sudo apt-get update -o Acquire::CompressionTypes::Order::=gz
sudo apt-get update


Resolve steps 2:
I am not sure above steps did resolve it completely. because I was still getting. Hash sum mismatch even after doing that.

Changing the main mirrors to different URL in Software source actually fixed in.

3. New problems:
Everytime I installed some pkg
It would try install some failed installed packages such as
shim-signed
grub-efi-amd64-signed


Resolve steps

sudo rm /sys/firmware/efi/efivars/dump-*
sudo update-grub
sudo apt-get -f install

References
Linux mint and askubuntu forums.

Thursday, November 9, 2017

sed, awk and bash it

Edit the files in folder

1. Chop off few words from the 1st line
2. Reads a particular word from the 1st line and then replaces that with some other word.

More particularly 
1. Removes "p tw" from the 1st line.
2. Replace the 3rd word(in line 1) with "0" in all the lines except line 1.

$cat sample
p tw 5 4
1 2
5 2
3 4
1 5

$cat required-sample
5 4
1 2
0 2
3 4
1 0


#!/bin/bash
for file in `ls *.gr`
do
    nodes=`awk 'NR==1{print $3}' $file` #takes the 3rd word which is n or |V|
    sed -i "1s/p tw //" $file             #chops the p and tw from the 1st line
    echo $file - done $nodes
    sed -i '2,$ s/$nodes/0/g' $file     #f   
done

Thanks to Vijay R


Thursday, September 7, 2017

Resolving expired GPG key and Github signing

My GPG key during creation had default expiry date which I didn't bother to change it at that time. One fine day it got expired. I was using that same key to sign commits on Github . In all my commits it was showing signed with unverified / expired key. However later from "password and keys" i was able to revoke the expiry. Even then after signing it was showing signed with unverified / expired key.

Here are the steps to resolve:
1. Github setting delete the existing GPG key
2. gpg --list-keys
3. gpg --armour --export  YOUR-KEY-ID
4. Copy it to Github GPG settings as new GPG key
5. Try committing and pushing on github!

All your commits have a verified and have a non-expired signature. :-)

Thursday, August 31, 2017

Install Gurobi on Linux and Hello world Gurobi !

Installation

System requirements

Any linux flavour would work
Recent gcc version 

Steps

1. Register Gurobi Optimizer(64b-Linux) Download http://www.gurobi.com/downloads/download-center
2. Register and get an academic licence from the same (note the cmd grbgetkey 36-digit-key )
3. Extract tar file to /opt
4. Generate licence file using the cmd

rajz@warriorwithin :/opt/gurobi751/$ ./linux64/bin/grbgetkey whatever-is-your-key

Note the license file must have got generated!!

6. append at the last line of .bashrc at $HOME/.bashrc using a texteditor

export GUROBI_HOME="/opt/gurobi751/linux64"
export PATH="${PATH}:${GUROBI_HOME}/bin"
export LD_LIBRARY_PATH="${LD_LIBRARY_PATH}:${GUROBI_HOME}/lib"
export GRB_LICENSE_FILE="/opt/gurobi751/gurobi.lic"

If any useraccount of the machine wants to use it, then they just have to perform step 6 on their ~/.bashrc

Hello World Gurobi Program!

// coming soon

Last Post !! Moved to new site

As I am getting old 😋, it seem like I can not remember many of my earlier tech encounters. This is the place I was logging so that I refer ...